Ran mostly at Lions, Bakersfield Fuel and Gas Championship and NHRA Winternationals in the ’60’s. Many time bracket winner, AHRA record holder, Class winner at Bakersfield.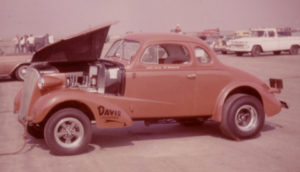
Hilborn injected 258″ small block. This was a destroked 265″ with one of the first sets of Warren Brownfield’s (AFR) cast iron heads and an Engle R600 roller. Ran a best of 11.72 @ 116 mph with 9:1 compression (blower pistons and no money to jack-up the compression). I ran a B&M Clutchflite with 6.14 gears and 27″ tires.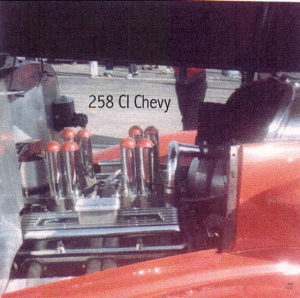
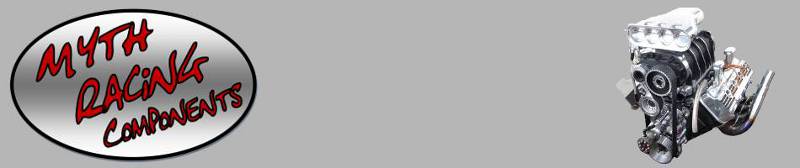
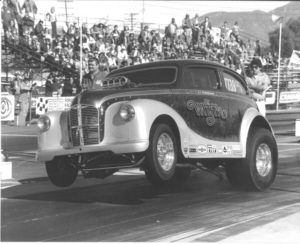
Ran across this picture while looking at dragsters on GeorgeKlass.net. Cool site. Towing home with my dad after winning B/G at the “March Meet” in 1965. I was running the “big” 341″ engine here at 12.30’s. I was one of the slowest in the class but beat the 11.70 qualifier for the trophy when he was over a half second late on the lights.
My ’57 wagon had about half dozen coats of Matador Red lacquer and about the same number of clear coats. It looked professional for my first and only paint job. I never told anyone about the hundreds of hours of color sanding needed due to all the “orange peel”. A friend at work was impressed and invited me to view the paint on his ’49 Plymouth. He painted it with spray cans – Orange wrinkle finish!
The dragster in the picture had two supercharged flatheads. It belonged to Norb Locke.
The 1965 March Meet was the last race for the 341″ motor. This picture with the C/G designation was probably at the 1966 March Meet running the 258″ motor.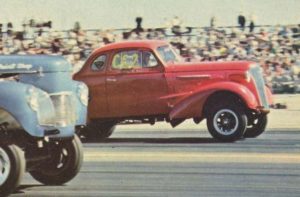
THE AUSTIN
In 1969 the ’37 Chevy was traded less engine and trans for the stock bodied ’49 Austin. I also had a ’48 front end with the small headlights which I utilized so I called it a ’48.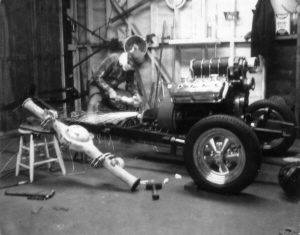
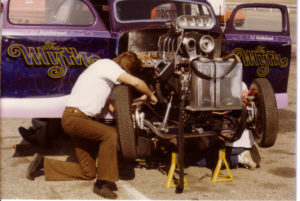
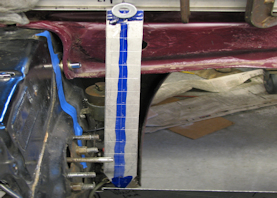
Stock Austin chassis getting “worked over”.
Stock chassis with Corvair coil springs in the rear and a single Ford transverse spring in the front. In about ’75 had Sarte Race Cars back halved the chassis, narrow the rear end and install Koni coilovers. The rear end was a 8 3/4 Chrysler with 5.38 or 5.57 gears. Even with 9000 rpm launches, never lost a rear end or axle. The secret here is zero backlash on the tightest ring gear tooth. The ladder bars were only 32″ long. Perfect for the 92″ wheelbase.
The top was chopped by my friend Ray Jones and his father at Jones Auto Body. To prevent an odd looking roofline like Mazmanian’s “football”, the front window pillar angle was left stock and about 6″ was added to the length of the roof. The window pillars in the doors were then hacked-up to fit the new opening. This required a “donor” car. We found one, took the pieces we needed and threw the rest away.
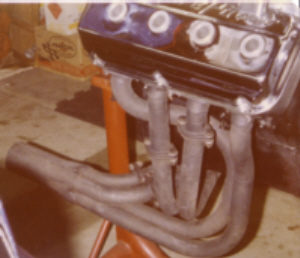
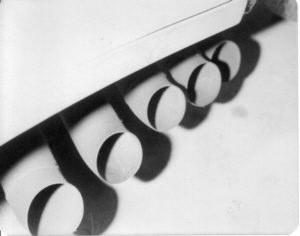
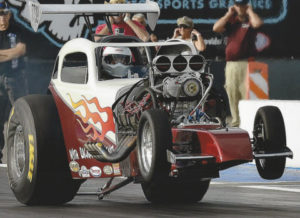
Plumbers Nightmare – 180 degree headers
The first set of headers were 180’s I whipped up. Four crossovers that had to be removed each time I needed to check the bearings! They dumped into 4″ collectors which pointed straight back. My crew member, Chuck Jones (and chief polisher), finally insisted I remove them. Running gasoline, it was taking about two hours to clean the black residue underneath after each outing. We ran these at the Winternationals for a couple of years and had some of the funny car guys over trying to figure out what was under the hood. It sounded like a very loud 12,000 rpm six cylinder. I have a cassete recording somewhere. I’ll post it when I find it. Note: Chuck was an avid peanut butter and jelly sandwich eater. Every time I was at his house – peanut butter and jelly. Chuck died at age 40. I no longer eat peanut butter and jelly sandwiches!
Shot by John Shanks for Drag Racing Magazine 1972
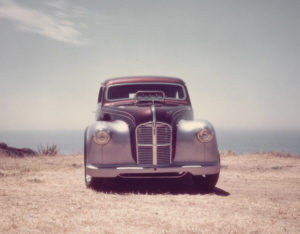
Taken on a cliff in Pacific Palisades, CA overlooking the Pacific Ocean. Bill Carter applied the multi-purple paint over a pearl base. DRM December 1972 issue.
John Shanks photo
Part of the photo shoot for Drag Racing Magazine December issue.
First run at Lions Drag Strip in ’72
Judging from the throttle opening, I haven’t changed my driving habit much. This was part of the “B/G Supercharged Association” meet in ’72. In December Lions closed.
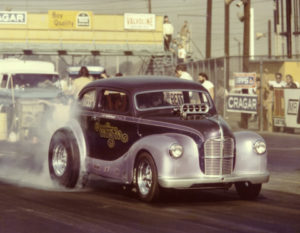
Orange County International Raceway ’73
Driving Lesson – The car is heading left. I remember looking over my left shoulder as the car drifted toward the wall. It got within about an inch but I never lifted and completed the pass. Dave Kommel photo.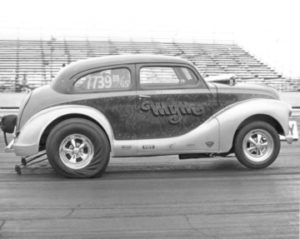
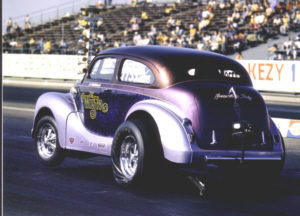
Irwindale ’73 – Tire distortion
This is an interesting shot. The tire is moving forward faster than the car. Note the huge bulge in the front and center of the tire. I was running 9.30’s here.
Just back from Sarte Race Cars. Irwindale mid-’70’s
Jaime back halved the car, narrowed the rear end and added coil-overs. I added the polished Cragar Super Tricks at the same time.
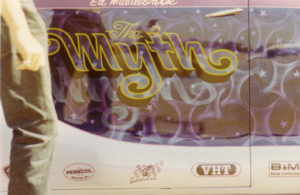
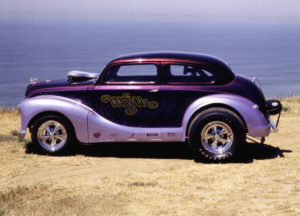
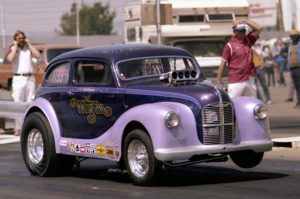
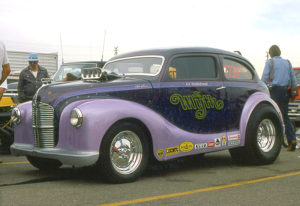
Hidden “Myth” graphics
I think this was one of Bill Carter’s best paint jobs. I gave him the color and car name. From there Bill just let his imagination take over. In the right light you could see the hidden “MYTH”. In other light it wasn’t visible.
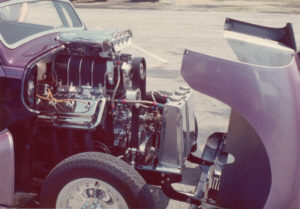
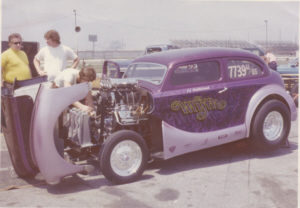
Engine shot – same day
If you look at the engine in my Fiat Topolino, it looks the same except for the valve covers because IT IS the exact same engine just 35 years later.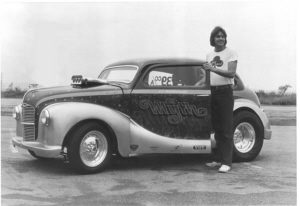
Irwindale B&W – same day
This is one of my favorite photos. The black and white photo makes the polished wheels stand out. What I’ve give to be 33 again!
Orange County Raceway
Removing the crossover pipes in an attempt to check the bearings. This was the last time for the 180 degree headers.
Standard “weed burners” ?????????
I never did anything “standard”. Actually there’s a logical reason. The lower radius rod attach bracket was in the road causing an odd gap between pipes. I just added an additional pipe to fill the gap. There were a lot of guys on their hands and knees trying to figure out what a 10-cylinder looked like.
 Fremont ’77
This is pretty close to a perfect launch – Left front up about 4″ with about 800 lbs. static in the twin McLeod 10″ clutch.
NHRA Winternationals ’79
Maybe a little too much clutch? Still a pretty cool shot. Good shot of starter Buster Couch. He once asked if he would ever witness a run where he couldn’t read the writing on the door. After driving this 92″ wheelbase car, the Fiat is like driving a Cadillac. This was one of the last (and quickest) runs for the Austin. We finished with a best of 8.57 @ 162 for a true 2950 lb B/GS (CC/A) car. I sold the car a few months later to Don McIntosh out of Denver. Dave Kommel photo.
Recently saw this picture on the Internet. Winternationals about 1976. Photographer unknown.
’48 FIAT TOPOLINO
As mentioned in the “About me”, I obtained this chassis by accident. I sold the Austin in ’79 but kept the engine assembled on an engine stand for 30-years. As with most of us with any sense, work prevails and the expensive hobbies take a back seat. My cousin passed on this car and my wife “suggested” I purchase it. Little did she know what she was getting into.
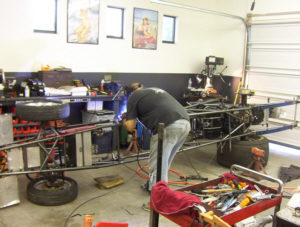
Chassis upgrades
The chassis is a 2000 Spitzer. It was originally setup for a big block Chevy and then modified for a late model Chrysler. Here my cousin is finishing the welding on bracketry to mount the early hemi.
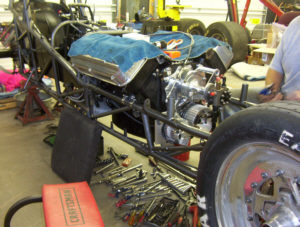
Engine – Mounted
Note the tools positioned for easy access!
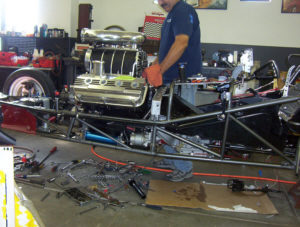
Blower on!
Blower mounted – I’m starting to get excited.
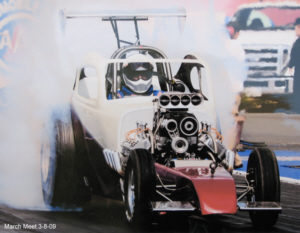
Bakersfield 2009
This is one of the first runs on the car at the 2009 Bakersfield “March Meet”. Running gasoline here. No rev control with the Vertex. This is probably a 9K burnout. As mentioned somewhere in one of the write-ups, the tip of the squirt bottle got caught under the injector butterfly on one attempt to fire . The computer indicated about 10,300 rpm without floating the valves. With the springs set at 200/550 lbs and .600 lift flat tappet it will rev these numbers. With the fancy (and heavy) aftermarket roller rockers you would be lucky to make 8500 – less if running a roller cam. Jack up the spring pressure for these modifications! By the way, put your best springs on the exhaust side – they float first. Photo by Gil Rebilas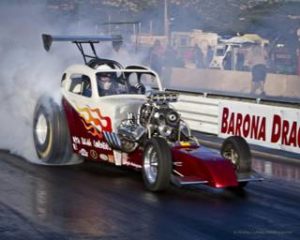
Barona 2011
Barona 1/8-mile on 10% nitro. Qualified 2nd with a 4.54. Our association allow up to 50% nitro with a 6.71 blower. In 2012 I was first in line when the previous car blew an engine at the finish line. I waited for cleanup. When I ran, my car made an immediate left in the lights. I cranked it right to miss the wall and was finally able to stop. The crew at the end of the track said they have never seen a car that far out of shape and “survive”. I figured if the track was more interested in running cars than making the track safe, I didn’t need to run there. I never came back.
The Flying Myth with late model hemi
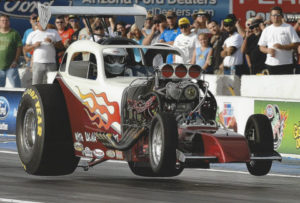
This is a rare shot of a flying drag car just off the starting line. Not so rare if out of shape or at the top end. The shot was taken at our last race of 2014 in Phoenix running the 511″ TFX. See next picture for explanation. Photos by Gil Rebilas
Rear tires are unloading due to springs on wheelie bars. You can see the rear wheels lifting. I let off the throttle an instant later and when the car came down it took a 4-wheel hop. The photographer had about a half-second time frame to get the shot and caught it perfectly. For the next run we removed the springs, drilled holes through the upper wheelie bar tubes, added a through bolt and eliminated any spring action. It launched perfectly for a 1.06 60′ time and a 7.19 elapse time. We had been fighting this problem for over a year. A video showed the springs allowed the wheelie bars to essentially take a double hit.
In 2016 I decided to up the rpm by changing from a 4.10 to a 4.30 gear. With 2.250 square Top Fuel intake ports, I decided they lacked velocity. At the NHRA Heritage Race in Phoenix the car ran 6.61 @ 209.92. That’s about 20 mph with a simple gear change.
California Hot Rod Reunion 2018 running in 7.0 Pro – enjoy the ride!
This was our 2nd qualifying run at the California Hot Rod Reunion in 2018. I had just changed from Goodyear 34.5-17×16 to the narrower M/T 35-15×16 due to tire shake. The M/T’s have a stiffer sidewall and therefore less “wind-up”. I had them set at 6 lbs. My best 60′ with the Goodyear was a 1.02 on the 6.61 run. On this run I had a .990 60′. Pretty good for something dialed-in for a 7.0 et. I also had a .997 and a .999. I went out in the 3rd round of eliminations but was extremely happy with the tires. If you have questions you can contact me at myth-racing.com.
Videos below (these are all with the early hemi) – Tribute to Ray Jones follows.
Check out the 1st round of eliminations at the Super Chevy Show in Las Vegas. Becky Sylvester moved past the staging lights giving me the automatic win. Not a bad run considering a 7.14 was the best ever.
Here’s a couple more taken by Eric Gates at Top Gun Raceway in Fallon, NV. Eric Runs 193 mph to my 176 but has to lift for a split second and I win by 2 feet!
Barona 1/8-mile. A couple qualifying passes. Good shot of the car – crappy performance. I ran here a couple times but after following a poor track cleanup causing me to go sideways in the lights, I decided it was time to remove Barona from my schedule. If unable to stop and you drive through the sand trap, it’s a 200′ drop-off.
This one is about 4 1/2 minutes in followed by another angle of the burnout and run.
Another qualifying pass at Barona about 13 minutes into the video.
Tribute to Ray Jones
I’ll end “Pics & Video” with a tribute to my friend Ray Jones. Ray painted my ’37 Chevy and along with his dad, chopped the top on the Austin.
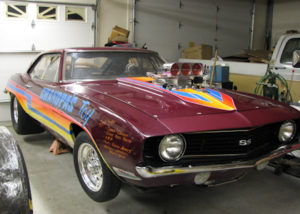
Ray and I raced his ’69 Camaro as a Super Gas car for a few years in the ’90’s. During one run the oil pump broke off his BBC destroying the bottom end. The car was parked. In 2000 I retired and moved in with my mother (92 years old) to help her out. I needed a project and Ray “thought” he had some engine parts at the balance shop (he hadn’t bothered to check for about 8-years). He brought the car and engine parts to my mother’s house. The engine turned out to be a 484 BBC, Mike’s P-glide, polished Enderle injector, 10.71 supercharger and drive – all new parts. Shortly after, Ray was out of work on disability but committed to sending me $50/month until the car was finished. Fast forward about 15-years. It’s now Christmas 2017, $8500 and thousands of labor hours later and I’m a couple weeks from wrapping it up. Ray’s wife calls – Ray died at age 77. Per her request, I sold the car. Other than safety equipment and odds and ends on the interior, my efforts were concentrated on the engine and engine compartment. I attempted to do everything myself to conserve money. Below are pictures of Ray’s Camaro and engine compartment. The radiator was moved ahead of the core support and everything crammed between the engine and core support.


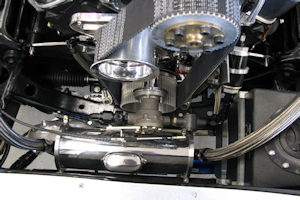
To give you an idea on how to save money, I fabricated the “puke tank” rather than purchase one. The tank was a salvaged piece of aluminum I got for $2.00. Rather than spend money on welding, I turned the round end caps on the lathe and added grooves for o-rings. The breather was from Moon. I stood the breather up on end on my mill and used a boring bar to create the curvature of the tank. It could then be bolted on rather than welded. The hold-down clamps were also machined on the mill using a rotary table. Other than the breather, the only expense was the polishing (as well as a thousand dollars worth of black AN fittings and stainless line).
The hardest things to fabricate were the inner fender panels. I’m going to explain here in case you need to tackle a similar project. Although they appear simple, the angle of the fenders along with the rise and fall of the frame was cause for about two weeks of thought. I determined the vertical pieces off the frame needed to be about 8″ in the rear where the frame drops and about 3″ in the front. The fiberglass hood had stiffeners that began 2 1/2″ in from the sides and dropped down about 1″. This meant the angle on the fender panel from top to bottom needed to start about 1 3/4″ in from the fender in order to clear the stiffener. See picture below. The only constant would be the angle. I started by installing the Dzus plates on both the fenders as well as the frame. I then purchased .060 aluminum sheet that was 1 3/4″ wide for the fender portion of the inner fender panel and another piece 9″ wide for the uprights coming off the frame. I mounted both strips on the Dzus tabs (for a correct fit, horizontal and vertical strips must be 90 degrees to each other). I then took a measuring tape and protractor and figured an angle at the front that would come out about 3″ up from the frame as well as the distance from top to bottom down the angle – It was about 14″. I made a 14″ aluminum scale and measured down from the top “horizontal” piece at the determined angle and marked where it hit on the bottom “verticals” in several places – this created the “bend line”. The vertical pieces were then trimmed at the line. Once this was done, a piece of cardboard was used between the top and bottom pieces of aluminum and trimmed to clear anything in the engine compartment (a-arms, brake lines, etc). Remove the upper and lower aluminum pieces and lay flat on the floor. Add the cardboard center section and mark the overall outline on a full sheet of aluminum. Have a sheet metal shop bend the angles along the “bend lines” and you’ve got the hard part done. Remember, the angles must add up to 90 degrees. If the top angle is down 40 degrees then the bottom angle will be 50 degrees. For the Chevy emblems, I purchased decals off e-bay and jitterbug sanded over the entire fender and decals. There you go – months of screwing around wrapped up in a few sentences. There’s a lot more work than covered here but you get the idea.
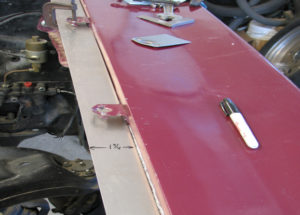 Horizontal 1 3/4″ top piece. The next step was adding the Dzus tabs under this piece, drilling and prepping for the Dzus buttons (not shown) and then installing the buttons to keep this piece in place. Repeat for vertical uprights. Note: Both top and bottom aluminum strips were used for layout only and then discarded. Once you get top, center and bottom pieces laid out, you then lay them on the floor to get the final sheet size. The burgundy colored Dzus tabs are for the hood.
I made this 14″ (graduated by 1″) scale to determine the “cut line” for the lower verticals. The vertical at the bottom of this picture has already been trimmed to the 14″. Barely visible is a centerline on the scale. I marked where this centerline intersected both top and bottom pieces so it could be assembled correctly when laid flat on the floor. I also used the centerline to measure over to the firewall (and core support) at every inch to determine the “profile” and then transferred it to the cardboard center piece. The washer is just something to overhang the top of the scale so it could be laid against the top horizontal piece.
If anyone actually reads this and has questions, give me a call.